Photo: Vince Mariel Conlu
Gone are the days of simple winged eyeliner; now, makeup enthusiasts are pushing boundaries and creating intricate designs that make a bold statement. Whether you're a seasoned eyeliner pro or a curious beginner, this guide has something for everyone. From bold geometric shapes to ethereal swirls and dazzling glitter accents, I've got the inspiration you need to transform your eyes into works of art.
Top 10 Graphic Eyeliner Looks That Will Make You Go ''WOW!"

- 1. Geometric Elegance:
Start with a simple cat eye and add a twist by incorporating geometric shapes like triangles or rectangles. Experiment with different alternative makeup brands and eyeliner colors to create a striking contrast against your eyelid. This modern and chic look is perfect for a night out or a special event.

Photo: intothegloss
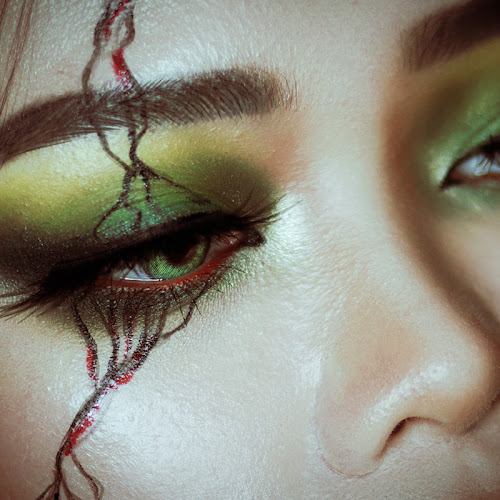
- 2. Neon Dreams:
Brighten up your eyes with neon hues for a futuristic and daring look. Neon pinks, greens, and blues can add a pop of color that instantly draws attention to your eyes. Pair this look with neutral eyeshadow to let your eyeliner steal the spotlight.

- 3. Double Winged Drama:
Elevate the classic winged eyeliner by doubling it up. Create a second wing above or below the traditional line for a bold and dramatic effect. For the full tutorial check out my Nocturnal Smoly Eye tutorial. This look is ideal for those who want to make a fierce statement without going too over the top.

Photo: carorolee
- 4. Floral Fantasy:
Embrace a fantasy aesthetic by drawing delicate flowers along your lash line. Use vibrant colors for a playful daytime look or opt for deeper shades for a sultry evening vibe. Floral graphic eyeliner adds a touch of whimsy and romance to your makeup routine.

Photo: Kasey Hopman
- 5. Glitter Galore:
Take your graphic eyeliner to the next level by incorporating glitter. Outline your eyes with a bold color and add a touch of glitter for a glamorous and eye-catching finish. This look is perfect for special occasions or when you want to add a touch of sparkle to your day.

Photo: Doja Cat
- 6. Negative Space Magic:
Explore the negative space technique by leaving strategic gaps in your eyeliner design. This creates a unique and edgy look that plays with the balance between filled and empty spaces. Experiment with different shapes and sizes to find the negative space style that suits you best.

- 7. Holographic Hues:
Step into the future with holographic eyeliner. Choose iridescent shades that shift in the light to create a mesmerizing and otherworldly effect. This look is perfect for those who love experimenting with unconventional makeup trends and want to stand out.

Photo: meicrosoft
- 8. Artistic Liner Accents:
Enhance your eyeshadow look with small, artistic liner accents. Consider adding dots, lines, or swirls to complement your eyeshadow colors. This subtle yet impactful graphic eyeliner style allows you to experiment without overwhelming your overall makeup look.

- 9. Watercolor Wonders:
Channel your inner artist by creating a watercolor-inspired eyeliner look. Blend different shades together to achieve a soft and dreamy effect. This look is ideal for those who want to add a touch of creativity to their everyday makeup routine.

- 10. Bold Color Blocking:
Make a bold statement with color blocking by using contrasting shades to create distinct blocks of color. This graphic eyeliner look is modern, edgy, and perfect for those who aren't afraid to experiment with vibrant and unconventional colors.
Summary...
Graphic eyeliner looks are a fantastic way to express your creativity and elevate your makeup game. Whether you opt for bold geometric shapes, dreamcore watercolor effects, or holographic hues, these looks will make a lasting impression. So, grab your favorite eyeliners, unleash your inner artist, and let your eyes become the canvas for these 10 beautiful and breathtaking graphic eyeliner looks that will undoubtedly make everyone go "WOW!"


Photo: Mocno Fotografia
Crafting your own jewelry is an incredibly fulfilling and empowering experience, allowing you to express your unique style and the satisfaction of wearing something you've created with your own hands. Today we are going to delve deep into the world of DIY jewelry-making! This extensive guide will inspire you to create trendy and stylish pieces right from the comfort of your home.
Get Creative: 5 Handy Jewelry-Making Tips for Beginners
- #1. Begin by gathering jewelry supplies and materials:
The journey of DIY jewelry-making begins with gathering the necessary supplies and materials. Start by visiting your local craft store or exploring online shops that offer a wide range of beads, charms, chains, and findings for your trendy online jewelry projects.
Consider the style and theme of the jewelry you want to create, and select materials that resonate with your personal taste and aesthetic preferences. Whether you prefer vibrant beads, delicate charms, or minimalist chains, the possibilities are endless. However, it is best to opt for high-quality materials, such as sterling silver or gold-filled components. Some beginners find it helpful to purchase starter kits that contain a variety of tools and materials, making it easier to experiment with different styles
- #2. Explore various techniques and tutorials to get acquainted with the process:
Once you've gathered your supplies, it's time to explore the vast array of techniques and tutorials available to aspiring jewelry makers. From basic stringing and bead weaving to more advanced techniques like wire wrapping and metal stamping, there's something for every skill level and interest.
Take advantage of online resources such as YouTube tutorials, blogs, and forums to learn new techniques and expand your repertoire. Set aside dedicated time for practice and experimentation, allowing yourself to explore different techniques and discover what resonates most with your creative vision.

Photo: eleonora
- #3. Look for the source of inspiration:
Inspiration can be found all around you, from the natural world to art, fashion, and culture. Take time to observe your surroundings and draw inspiration from the beauty and diversity of the world around you. You can also try to experiment with different materials, colors, and textures. My personal favorites: are textured wood and crystal, as they are more eco-friendly. However, upcycling your jewelry is also a wonderful thought!
Try to keep an art journal, simple sketchbook, or mood board to capture your ideas and inspirations. This will allow you to remember them, developing and improving your ideas over time. Remember, creativity knows no bounds, so embrace the freedom to express yourself and let your imagination soar.
- #4. Pay attention to every little detail:
When creating DIY jewelry, attention to detail is paramount! Quality craftsmanship not only enhances the overall aesthetic but also ensures durability. Double-check the closure mechanisms, crimps, and knots to guarantee your jewelry withstands daily wear. Take your time when creating each piece, and don't hesitate to make adjustments as needed.
Additionally, you may want to consider the weight of your jewelry; while statement pieces can be bold and eye-catching, they should remain comfortable for extended wear. Don't worry, with practice you'll be able to nail every detail.
- #5. Sharing your creations, ask for suggestions:
Once you've created your aesthetic jewelry masterpieces, don't keep them hidden away – share them with the world! Wear your creations proudly or give them as thoughtful gifts to friends and loved ones. You can also explore opportunities to sell your jewelry online through platforms such as Etsy or at local craft fairs and markets. Plus, connecting with other DIY enthusiasts and jewelry makers can be a powerful source of inspiration and support.
Wrapping up...
There you have it! With these five handy tips, you're well on your way to crafting fabulous jewelry that reflects your unique style. So grab your beads, unleash your creativity, and get ready to impress everyone with your handmade masterpieces! And, of course, happy crafting, I hope you'll enjoy the process as much, as the result.


Photo: imustbedead
Dreaming of mermaid blue one day and epic pink emo hair the next? While vibrant hair hues are captivating, the reality is, that constant color-hopping can wreak havoc on your strands. Yeah, Ramona Flowers surely paid for her rapid color changes! Bleaching, dyeing, and repeating can leave hair dry, brittle, and prone to breakage. But this surely doesn't mean you have to abandon your dream hair color!
The color wheel, a tool used by artists for centuries, can be your secret weapon in mastering hair color. In this article, we are going to explore the science behind the color wheel and its relevance to hair coloring techniques, revealing how you can use it to achieve vibrant results that you'll love.
Understanding the Color Wheel:
The color wheel is a visual representation of color relationships, showcasing the spectrum of hues and their interplay. It consists of primary colors (red, blue, and yellow), secondary colors (green, orange, and purple), and tertiary colors, formed by mixing a primary color with a neighboring secondary color. Understanding the color wheel is crucial for achieving harmonious and visually appealing hair color results.
- Complementary colors: Sitting opposite each other, they create vibrant contrast (think fiery red against cool green). Use them for bold highlights or dip-dye effects.
- Analogous colors: Neighbors on the wheel, they blend seamlessly (like warm brown transitioning to fiery auburn). This creates a natural, harmonious look.
- Neutralizers: Some colors cancel each other out. For example, blue-violet tones combat brassiness in brown hair.
Step 1: Identifying Your Base
Where do you stand in this colorful spectrum? Look closely at your current hair color. Is it cool (looks more blue or purple) or warm (yellowish, or orange)? Light or dark? Maybe it is all blotchy after the uneven bleaching? Pinpoint its position on the wheel. This will be your starting point.

Photo: Joshua Roberts
Step 2: Charting Your Transformation
Ready to explore? Here are some color strategies based on your desired effect:
Minimal Change, Maximum Impact: For subtle yet noticeable variation, stay within your tone family. For example, a brunette can venture towards rich auburn or mahogany, while blonds can play around with pastel goth hair colors.
Bold Statement: Embrace the drama! Add complementary highlights for a striking contrast. Brown hair with emerald green streaks? Why not!
Natural Flow: Prefer a seamless blend? Analogous colors are your friend. Brown hair enriched with golden highlights or red-violet lowlights creates a sun-kissed dimension.
Banishing Unwanted Tones: Brassy blondes, fear no more! Use neutralizing colors. Orange tones vanish with a touch of blue-violet, while light yellow (banana peel color) disappears with blue.
- The "Lift" Factor: Lighter ≠ Easier
Remember, lightening requires "lifting" pigments with bleach, which can damage hair. Lighter shades, like "open canvases," readily absorb new colors. Going darker often doesn't involve bleach, but the color might be harder to remove later.
How to Switch Between Vibrant Hair Colors With Color Wheel
Craving a drastic color transition from fiery orange to teal? Stick to "analogous colors" nestled together on the wheel for seamless shifts, like orange melting into yellow-green. But for a bolder leap, consider "color removal" (think bleach, done safely with a pro!).
Next, choose your new vibrant hue based on the wheel. Worried about brassiness? "Depositing" a complementary color first neutralizes unwanted tones before your vibrant masterpiece arrives. If you want a smoother transition into your new hair color, play with "highlights and lowlights" in analogous or complementary shades for vibrant dimensions without a full base change.

Photo: Daniel Ursache
Avoiding Color Disasters:
While the color wheel is an invaluable tool, it's important to consider other factors like hair texture, maintenance, and your lifestyle. Drastic changes in color, especially from one end of the wheel to the other, may require more upkeep and may not be suitable for everyone.
Additionally, it's advisable to perform strand tests before committing to a full-color application. This helps you gauge how your hair will react to the chosen color and ensures that you achieve the desired result without any unpleasant surprises.
If you're considering a drastic change, especially from dark to light, it's advisable to consult a professional. They can assess your hair's health, determine the best course of action, and minimize potential damage.
Let's wrap up...
So, are you ready for a drastic color change? With this color wheel knowledge, you're equipped to make informed choices and embark on a vibrant hair journey. Remember, the most important rule is to embrace your unique beauty and have fun experimenting!


Photo: Olena Bohovyk
If you love all things magical and ethereal, you have surely heard about the fairycore aesthetic. It encapsulates the essence of a mystical, nature-centric world. But what exactly is Fairycore? It's more than just a fashion trend; it's a way of life. It's about celebrating the beauty of nature, the wonder of folklore, and the playful spirit of childhood.
It's about connecting with the magic that exists all around us, even in the most ordinary corners of our world. Get ready to unleash your inner fae, and sprinkle some magic on your life, because today we are going to be talking only about this!

What Is Fairycore?
Fairycore is a visual aesthetic that celebrates a fantasy-based vibe, drawing inspiration from the magical realms of folklore, fairy tales, and the natural world. It transports enthusiasts into an otherworldly setting, embracing a love for nature, whimsical fashion, soft color palettes, and a touch of vintage nostalgia. This aesthetic encourages a connection to the environment, fostering an appreciation for flora, fauna, and the simple joys found in the wilderness.
- How It All Began...
The roots of Fairycore can be traced back to the growing interest in cottagecore, a trend that romanticized rural life and simple pleasures. As it evolved, enthusiasts incorporated elements reminiscent of fairy tales and fantasy, leading to the birth of Fairycore. Online communities on platforms like Tumblr and Pinterest pla
yed a pivotal role in spreading its allure, inspiring countless individuals to embrace this enchanting aesthetic.
yed a pivotal role in spreading its allure, inspiring countless individuals to embrace this enchanting aesthetic.
- The Rising Popularity of Fairycore
Fairycore’s appeal lies in its ability to transport people into a whimsical world, offering an escape from the hustle of modern life. Its rise in popularity can be attributed to its inclusive nature; anyone can embody this aesthetic, adapting it to their alternative style and personality. Moreover, amidst chaotic times, the serene, nature-infused vibe of Fairycore provides solace and a sense of tranquility.

Key Features of Fairycore Aesthetic
Fairycore encompasses various defining features that contribute to its magical allure. Soft, pastel color palettes dominated by hues of greens, pinks, blues, and creams evoke a dreamy ambiance. Fashion elements include flowing dresses (my personal favorite!), lace, floral patterns, and vintage-inspired clothing that exudes a whimsical charm.
Additionally, incorporating natural elements such as flowers, crystals, and fairy lights into living spaces further enhances the Fairycore ambiance.
- How to Dress Fairycore?
Achieving the Fairycore look involves embracing a mix of vintage styles, natural fabrics, and a touch of whimsy. Flowy dresses, ruffled blouses, crochet tops, and skirts in soft, earthy tones or pastel shades form the core of Fairycore fashion.
Layering with lace, incorporating floral prints, and accessorizing with handmade jewelry and flower crowns complete the look, evoking a sense of enchantment and grace.

Photo: Katie Bright
- What About Fairycore Makeup?
Fairycore-inspired makeup revolves around a natural, dewy look with subtle, ethereal touches. Soft, rosy cheeks, a hint of shimmer on the eyelids, and natural-looking, flushed lips create a youthful and dreamy appearance. Delicate winged eyeliner or a touch of glitter adds a whimsical flair. Embracing a minimalistic approach with makeup while focusing on enhancing natural features is the key to achieving the Fairycore aesthetic.
Let's Wrap Up...
Fairycore aesthetic continues to captivate the realms of music, fashion, and makeup worldwide, offering a haven of serenity and magic in a bustling world. Its fusion of vintage elegance, natural elements, and fantasy-inspired charm resonates with those seeking a connection to nature and a touch of enchantment in their lives. Fairycore offers a doorway to a world where magic, nature, and imagination intertwine.
Subscribe to:
Posts (Atom)